

はじめまして。小國です。
今回は、Docker Compose で構築されたプロジェクトを、Bitbucket Pipelines を使ってインテグレーションテストする方法をご紹介したいと思います。
はじめに
シーズのプロジェクトの開発環境・手法は、主に以下のような構成となっています。
- VCS に Git を使い、Bitbucket にホスティングしている
- 各プロジェクトは Docker Compose を使い、ローカル環境を構築し、開発を行っている
- PHPUnit などを使って、テストケースを書いている
Bitbucket Pipelines で Docker Compose を使うには
Bitbucket には Pipelines という CI/CD サービスがあり、Docker を使ったテストが行なえます。
ですが、Pipelines で Docker Compose を使うためには、自身で Docker Compose バイナリを作成しなければなりません。
今回は、Docker Compose バイナリの作成・公開し、サンプルプロジェクトを使って、Pipelines で PHPUnit のテストを実行するまでを行います。
やってみましょう
主な流れは以下のようになります。
- Docker Compose バイナリの作成と、作成したバイナリを Docker Hub に公開
- サンプルプロジェクトの作成
- bitbucket-pipelines.yml の作成
- Bitbucket で Pipelines の有効化
Docker Compose バイナリの作成と、作成したバイナリを Docker Hub に公開
なお、https://hub.docker.com/r/seedsstd/seeds_bitbucket_pipelines にほぼ同様のイメージを公開していますので、こちらを使用する方は、このステップは不要です。
- Docker Compose バイナリの作成
1$ mkdir seeds_bitbucket_pipelines && cd seeds_bitbucket_pipelines
2$ cat <<EOF > Dockerfile
3FROM docker:stable
4# Add python pip and bash
5RUN apk add --no-cache py-pip
6RUN apk add --no-cache python-dev libffi-dev openssl-dev gcc libc-dev make
7RUN apk add --no-cache bash
8# Install docker-compose via pip
9RUN pip install --no-cache-dir docker-compose
10EOF- 作成したバイナリを Docker Hub に公開
1docker build -t <YOUR_ACCOUNT>/seeds_bitbucket_pipelines:stable .
2docker push <YOUR_ACCOUNT>/seeds_bitbucket_pipelines:stable
<YOUR_ACCOUNT> には、自身の Docker Hub アカウント、またはオーガニゼーションを指定してください。
1docker build -t seedsstd/seeds_bitbucket_pipelines:stable .
2docker push seedsstd/seeds_bitbucket_pipelines:stable
サンプルプロジェクトの作成
サンプルプロジェクトを作成ます。ファイル構成、内容は以下のとおりです。
1$ tree
2.
3├── composer.json
4├── composer.lock
5├── composer.phar
6├── docker-compose.yml
7├── php-apache
8│   └── Dockerfile
9└── tests
10└── SampleTest.php
112 directories, 6 files- composer.json
1{
2"name": "seeds-std/blog_bitbucket_pipelines",
3"authors": [
4{
5"name": "SEEDS Co.,Ltd",
6"email": "info@seeds-std.co.jp"
7}
8],
9"require": {},
10"require-dev": {
11"phpunit/phpunit": "^8.3"
12}
13}
14- docker-compose.yml
1version: "3"
2services:
3web:
4build: php-apache # php7.2-apache に git が入っていなかったため作成
5volumes:
6- ./:/var/www/html
7- php-apache/Dockerfile
1FROM php:7.2-apache
2RUN apt-get update -y && apt-get install -y git- tests/SampleTest.php
1<?php
2class SampleTest extends \PHPUnit\Framework\TestCase
3{
4/**
5     * @return void
6     */
7public function testTrueIsTrue()
8{
9$this->assertTrue(true);
10}
11}
12
ここでのポイントは docker-compose run --rm web bash -c "php composer.phar install && vendor/bin/phpunit tests/SampleTest.php" というような形で、ホスト側から PHPUnit のテストが実行できることです。
ためしに、実行してテストが通ることを確認しましょう。
1$ docker-compose run web /bin/bash -c "php composer.phar install && vendor/bin/phpunit tests/SampleTest.php"
2Do not run Composer as root/super user! See https://getcomposer.org/root for details
3Loading composer repositories with package information
4Installing dependencies (including require-dev) from lock file
5Nothing to install or update
6Generating autoload files
7PHPUnit 8.3.5 by Sebastian Bergmann and contributors.
8.                                                                   1 / 1 (100%)
9Time: 545 ms, Memory: 4.00 MB
10OK (1 test, 1 assertion)
良さそうですね。
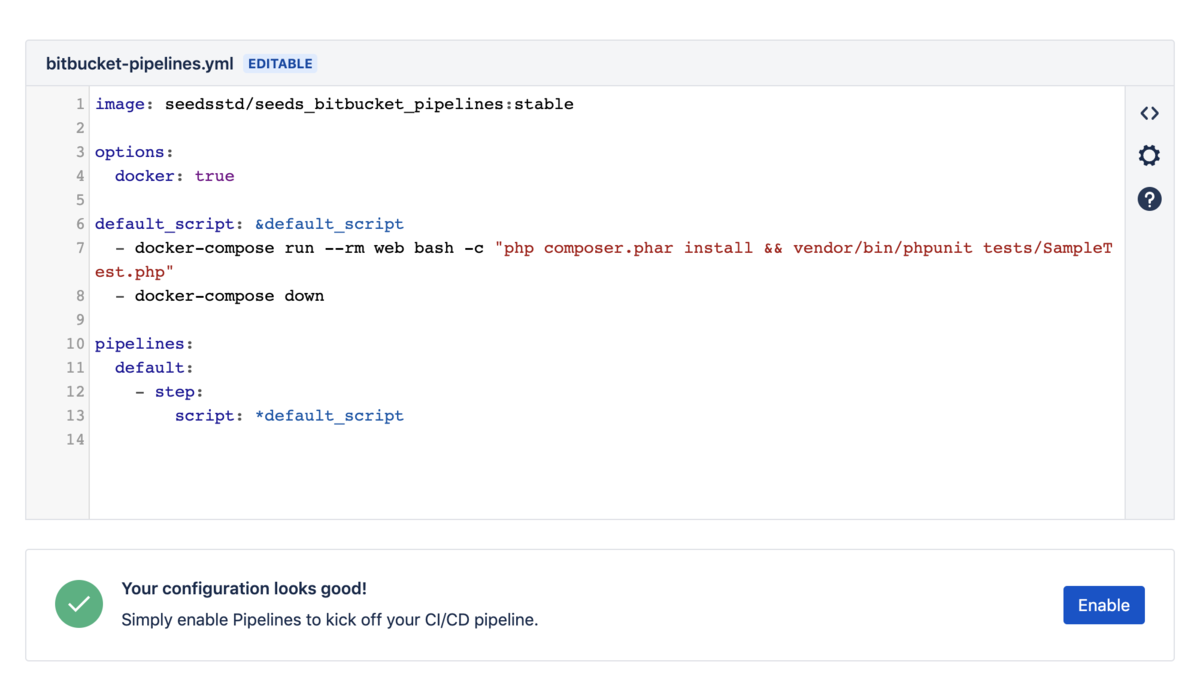
bitbucket-pipelines.yml の作成
以下のような bitbucket-pipelines.yml を作成し、リポジトリの直下に含めます。
内容は、上記で作成した Docker Compose バイナリを使い、そのホストからコンテナを起動しテストする内容になっています。
1image: seedsstd/seeds_bitbucket_pipelines:stable
2options:
3docker: true
4default_script: &default_script
5- docker-compose run --rm web /bin/bash -c "php composer.phar install && vendor/bin/phpunit tests/SampleTest.php"
6- docker-compose down
7pipelines:
8default:
9- step:
10script: *default_script
11
Pipelines の有効化
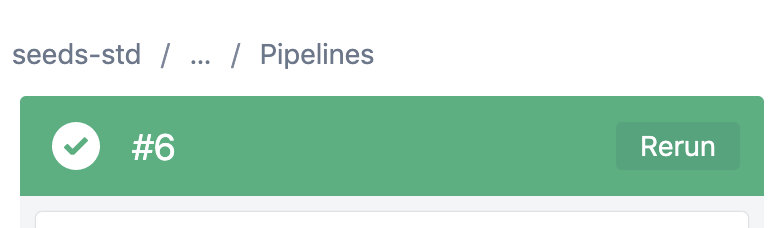
最後に、Bitbucket の画面から Pipelines を有効化します。
Pipelines を有効化すると、以下のように bitbucket-pipelines.yml で指定したテストが実行されます。
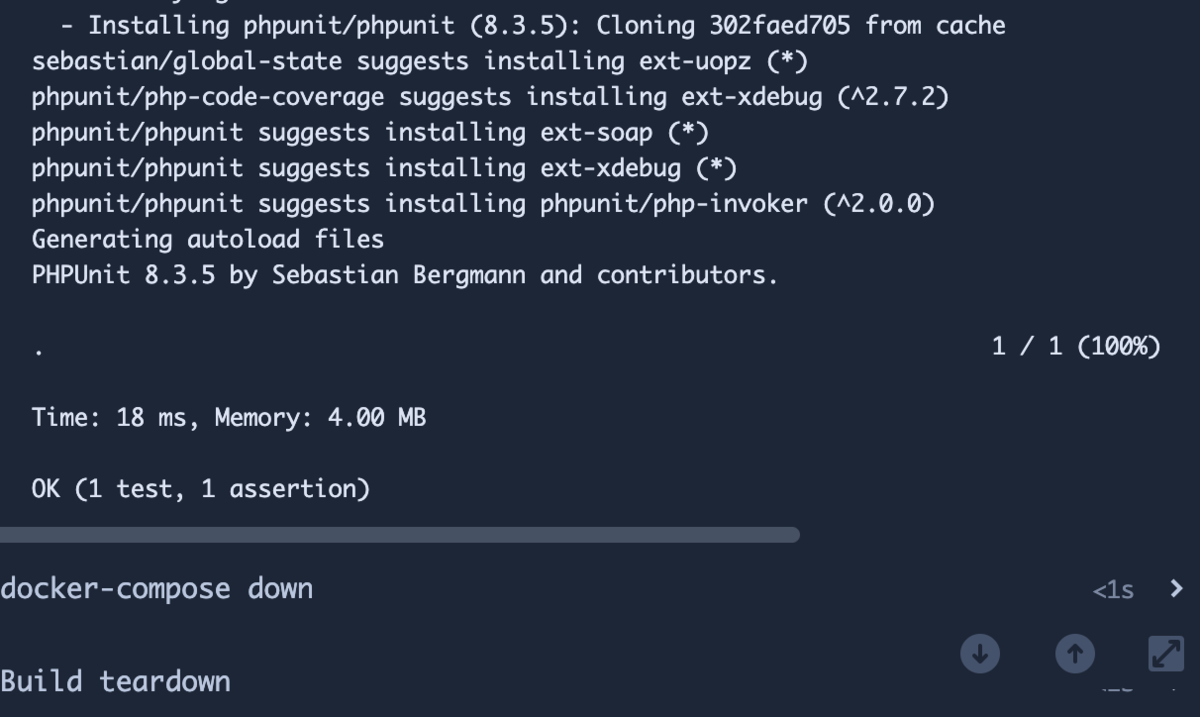
テストが全て正常に終わり、以下のようになればおkです。
最後に
Bitbucket Pipelines で Docker Compose を使用したプロジェクトのテストを実行することができました。